Troubleshooting Guide:
R5N Models
Need help determining your model? Visit our Troubleshooting Guides page for assistance.
IF THE REMOTE DOES NOT LIGHT UP OR THE BED WORKS INTERMITTENTLY
A) Change the batteries to 2 AAA lithium batteries of any brand.
Make sure the batteries are facing the correct directions.
Make sure the terminals of both batteries are in contact with the metal on either side of the battery compartment.
Make sure you are not using rechargeable batteries.
IF THE REMOTE LIGHTS UP, BUT NOTHING WORKS ON THE BED:
B) Check for power to the base:
Check to see if there is a green light on the transformer - the black box on the floor attached to the power cord. Our bases should be plugged into a surge protector that is at least 600-700 joules, higher is better, and at most 400V, lower is better.
If the green light is on, please proceed to the next step.
If the green light is not on, please do a hard reset by unplugging your base for 30 minutes and plugging it back in to see if the light comes back on. If the green light still does not come on, please email service@innovasleep.com, or call 877-386-1373.
If you have a Split King base, please switch the transformers/power cords on the two sides of your base to see if the green light comes back on. If the light is still not on, please do a hard reset following the steps above.
C) Child Lock Instructions:
*Testing the child lock: Press the flashlight button. If the backlight comes on when you press the flashlight button, the child locks are on. If the backlight does NOT come on when you press the flashlight button, the child locks are off.*
Press and hold the HEAD DOWN arrow and the FOOT UP arrow until the remote blinks (see Figure 4).
If you want to turn the child locks back on, you would repeat this step.
PLEASE NOTE: If the child lock feature is turned on, the remote WILL NOT sync to the adjustable base
D) Sync Instructions:
You may have the easy-to-reach RESET/SYNC button on your bed model. The easy-to-reach RESET/SYNC button is a small blue button located on the cord that is plugged in under the bed and plugs into the ACDC black transformer that sits on the floor. If you follow along your power cord from the wall or surge protector towards the bed, you should run into it after you go past your transformer (see Figures 1, 2, and 3).
If you don't have the easy-to-reach RESET/SYNC button on your bed model, you will have to look for the control box attached under the bed and then locate the RESET/SYNC button on the side of the box (see Figures 1, 2, and 3).
To sync the remote to the bed, simultaneously press and hold the HEAD UP and FOOT UP arrow buttons on your remote (see Figure 3).
Then, while holding both buttons on your remote, also press and hold the reset button on either the easy-to-reach RESET/SYNC cord or on the control box underneath the bed, depending on what model you have.
If the sync is successful, you will hear some quick beeping noises.
*** If your base was not flat when you tried to sync the remote, press the easy-to-reach RESET/SYNC button to lower the base. Then, remove and reinsert both batteries in the remote, and try the sync process again.***
***If the sync did not work, try it again - you may not have pressed and held the remote buttons simultaneously or long enough for them to sync.***
*** If your remote still doesn't operate your base after using the easy-to-reach RESET/SYNC button, you can try syncing your remote with that button instead of the easy-to-reach button using the same process.***
E) Changing the frequency of your remote:
To determine how to change the frequency on a Richmat remote, you need to know the year that the remote was manufactured. This is located on the sticker in the battery compartment cover - look at the first 4 numbers of the SN # to determine what year the remote was manufactured.
Take the batteries out of the remote.
If the remote was made before 2020: Hold the HEAD UP button on the remote while inserting the batteries. (Video tutorial below).
If the remote was made in 2020 or later: Hold the HEAD UP & FOOT UP arrow buttons on the remote while inserting the batteries. (Video tutorial below).
When you release the button(s) the flashlight at the top of the remote will flash to indicate that the frequency of your remote control has changed.
There are between 60-100 frequency settings, so this process should be repeated at least five times to ensure you connect to a completely different frequency.
*The remote will need to be synced to the base once the frequency is changed.*
F) Hard Reset Instructions:
If syncing your remote does not resolve the problem, unplug the bed from power for 30 minutes and plug it in.
After the hard reset, try the sync instructions again.
IF YOU WOULD LIKE TO CLONE YOUR REMOTE:
G) Information for Customers with King Bases:
If you have a Split King base with two Twin XL mattresses and want to use both remotes to operate each side of your base separately, you will need to sync one remote to each side of the bed. Once you do this, one remote will control the right side and the other remote will control the left side.
If you have a Split King base with a King mattress, sync one remote to both sides. This remote will be called the ‘Master Remote’ and will control both sides of the bed at the same time. If you want to use two remotes to control the bed bases at the same time, you can clone the second remote, but make sure you mark the master remote somehow so you can tell the two apart.
H) Cloning Instructions:
Follow the sync instructions in Step D to program the MASTER REMOTE.
Then, on the SECONDARY REMOTE (the one that is not synced with the beds), press and hold the HEAD DOWN ARROW and FOOT DOWN ARROW buttons. The flashlight will be on for 10 seconds. (See Figure 5)
Meanwhile, on the MASTER REMOTE (the one that is synced with the beds), press and hold the HEAD UP ARROW and FOOT UP ARROW buttons. (See Figure 5)
The copying process is successful when the flashlight starts to flash. Now both remote controls will be able to control both beds to the same position.
I) Uncloning Instructions:
To desynchronize the secondary remote from the master remote, press and hold both the central raise and lower buttons on the SECONDARY REMOTE.
The un-cloning process is complete when the flashlight on the SECONDARY REMOTE turns on normally (see Figure 6).
To fully disconnect the MASTER REMOTE, change the frequency (using instructions in step E), then resync each remote to separate sides of the adjustable bed base.
MEMORY BUTTONS
The remote will have 5 memory buttons for your base, M1, M2, TV, ANTI-SNORE, and ZG. These buttons can save favored positions to the memory. These buttons do not come pre-programmed and will have to be set up individually.
J) To program the memory buttons
Adjust the bed to the desired position.
Press and hold the desired memory button (M1, M2, TV, ANTI-SNORE, or ZG, see Figure 7) until the backlight flashes to confirm the successful setting.
Test that the setting has been saved by pressing the FLAT button to fully lower the base. Then, press the memory button to ensure it raises to the desired position.
You can program or reset the 5 position buttons by following the steps above.
WHEN TWO BEDS DO NOT ALIGN:
Your bed base might have a levelright knob. If you do have one, you can adjust the height of the bed bases. On the higher angled bed of the two, use a 19mm wrench to turn the nuts on the new “LEVEL RIGHT” counterclockwise to adjust the angle until the higher angle bed matches the level of the lower angle bed and lock the nut with the reinforced nuts.
Emergency Lower:
If your base is stuck in an upright position and your transformer has a green light, but the base still does not work after completing the steps above, you can lower it by pressing the blue easy-to-reach sync button.
***Please feel free to contact us, or email us at service@innovasleep.com, or call us at 877-386-1373 if you have any questions or concerns. If the troubleshooting guide did not resolve the issue with your bed base, please let us know what step the troubleshooting guide did not work for you so that we can diagnose the problem.***
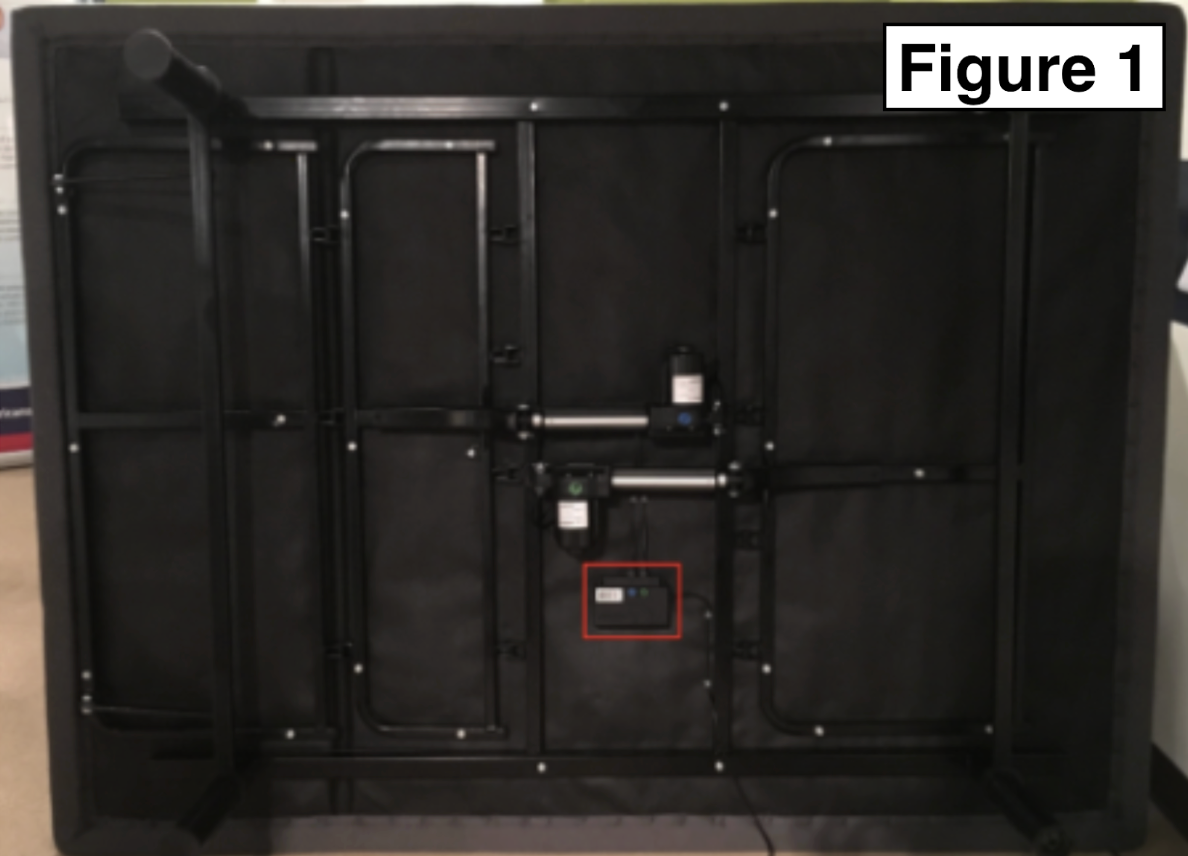
Control box location under base

Reset/sync button on control box

Sync instructions for remote and reset/sync button
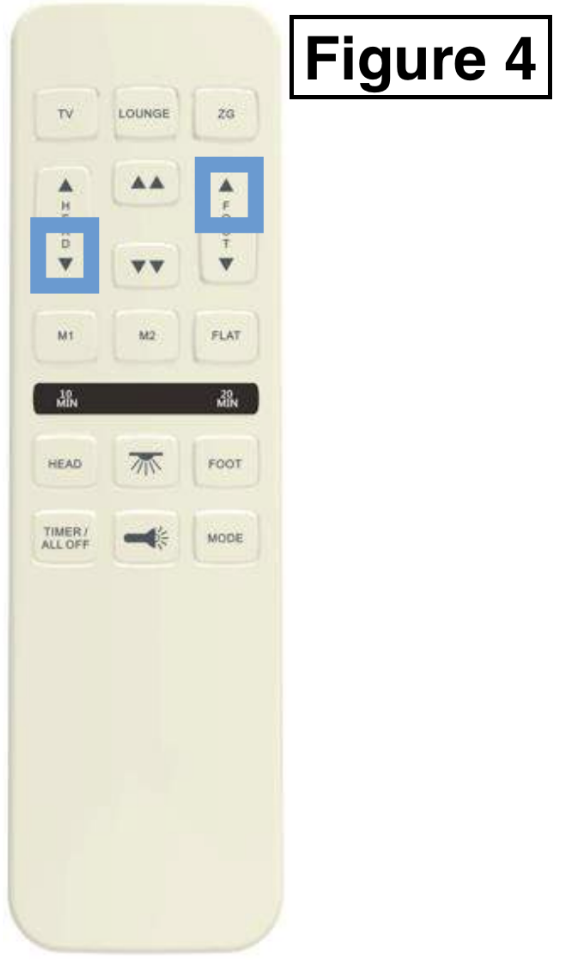
Child lock buttons

*For split bases* Cloning buttons

*For split bases* Uncloning buttons

Memory buttons
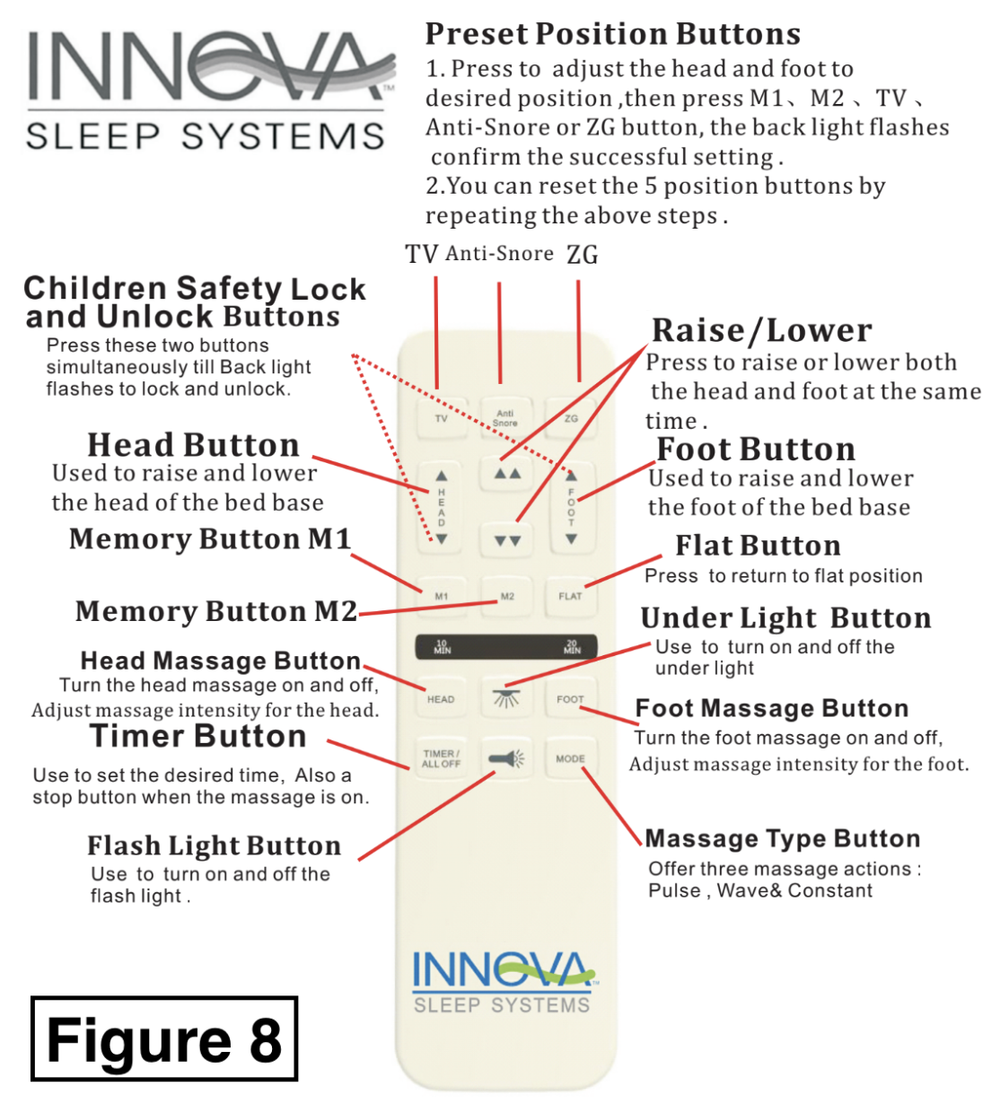
Remote explained
Getting to know the electronics on your base
-

Remote
The remote buttons should light up when pressed and you should see “R5N” on the back. The remote communicates with the control box.
-

Control Box
This is the “brain of the bed” and has a blue “sync” button on the cord. The actuators and massage motors plug in directly.
-

Transformer
The transformer connects to the power cord and is likely sitting on the ground. It should have a green light indicating the base is getting power.
-

Power Cord
One side plugs into the outlet on the wall and the other into the transformer.
-

Massage Motor
These are the vibrational massage motors on your base.
-

Actuator
These are the motors that raise and lower the head and foot of your adjustable base.
-

Underbed Light
This is the light underneath your base that you can turn on using your remote button.
-
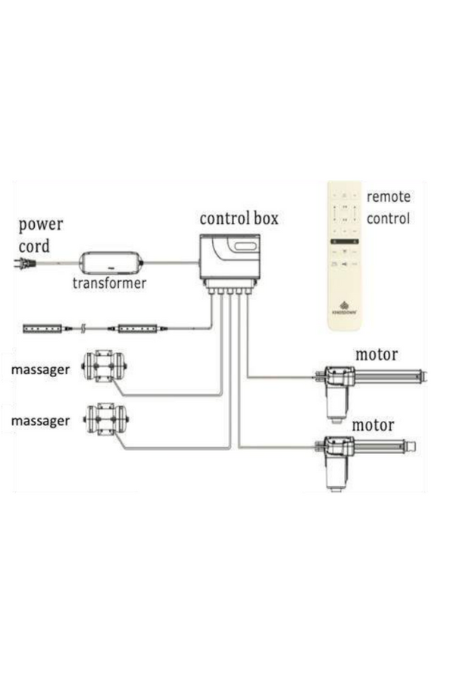
Electronics Set-Up
You can also find this diagram in your base’s manual.

